Today I’m going to show you how to create and manage robots.txt file in Magento 2.
Robots.txt is an all important file from the SEO perspective which contains instructions for the web crawlers i.e. search engines as to which pages to crawl and which not. This one tiny file can get your entire store or specific pages out of search index if configured incorrectly. There will be sections or pages in your store which you won’t want to be indexed and robots.txt file is the place to communicate this to search engines. Almost every website needs this file and so do Magento 2 stores.
Why Robots.txt File is Important?
Fortunately, it’s very easy to create and configure robots.txt in Magento 2 which we will have a look at here. Before we do that, let’s have a look at some important reasons for having a robots.txt file.- If you want to prevent duplicate content from being indexed
- If you want to keep entire sections of a website private.
- If you want to restrict specific pages from appearing in SERPs. For example, thank you page.
- If you want to prevent certain files from being indexed and displayed public (images, PDFs, etc.)
- If you want to avoid your web server from Google’s crawlers request overload. This can be done by specifying a crawl delay.
Magento 2 Robots.txt Location
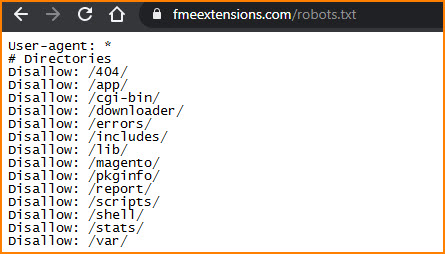
An easy way to locate your website robots txt file is to access the file via the following path:
https://domain.com/robots.txt
How to Create Robots.txt in Magento 2?
To create Magento 2 robots.txt file, follow these steps:- Log in to Admin Panel.
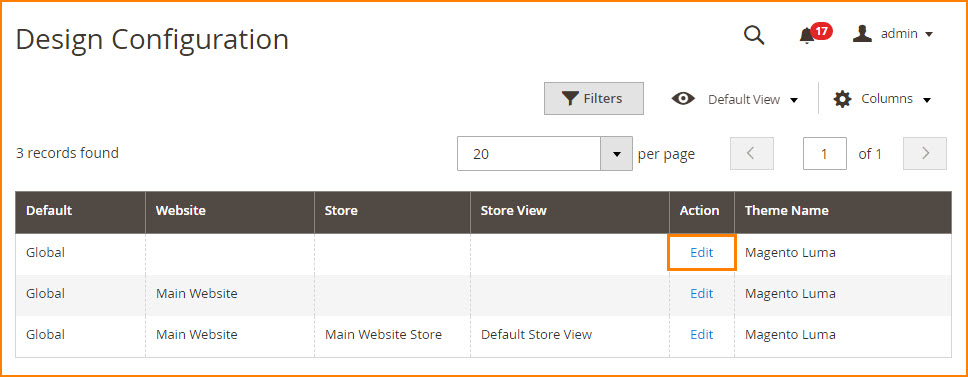
- Navigate to Content -> Design -> Configuration
 Expand the Search Engine Robots.
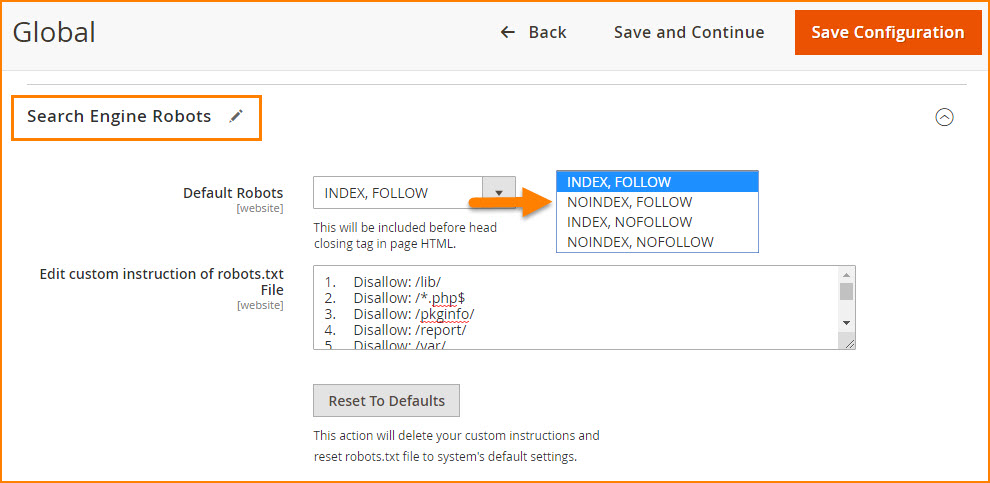 Set Default Robots to one of the following.
- INDEX, FOLLOW: Tells crawlers to index the store and check later for changes.
- NOINDEX, FOLLOW: Tells crawlers not to index the store but check later for changes.
- INDEX, NOFOLLOW: Tells crawlers to index the store but don’t check later for any changes.
- NOINDEX, NOFOLLOW: Tells crawlers not to index the store and don’t check later for any changes.
In Edit Custom instruction of robots.txt File, enter any custom instructions for the file if you feel the need for it. For example, you might want to disallow access to all folders while you are still developing your store. Refer below for some custom robots.txt instructions.
The Reset To Defaults button will reset the robots.txt file to the default, removing all the custom instructions.
Once you’re done, click Save Configuration button to apply the changes.
You can also use No-Index No-Follow Magento 2 extension to automatically set Meta Robots Tags for product, category & CMS pages.Configuring Magento 2 Robots.txt with Custom Instructions
You can enter custom instructions for robots.txt file to allow/disallow crawlers to index certain pages or directories.Magento 2 Robots.txt Example:
Below are commonly used examples.Allow full access to all directories and pages
User-agent:*
Disallow:
To exclude all robots from the entire server (all directories & pages)
User-agent:*
Disallow: /
Disallow Bing bot from accessing a specific folder
User-agent: Bingbot

Disallow: /foldername/
Disallow Bing bot from accessing a webpage
User-agent: Bingbot

Disallow: /foldername/restricted-webpage.html
Default Instructions
1.	Disallow: /lib/
2.	Disallow: /*.php$
3.	Disallow: /pkginfo/
4.	Disallow: /report/
5.	Disallow: /var/
6.	Disallow: /catalog/
7.	Disallow: /customer/
8.	Disallow: /sendfriend/
9.	Disallow: /review/
10.	Disallow: /*SID=
Restrict User Accounts & Checkout Pages
1.	Disallow: /checkout/
2.	Disallow: /onestepcheckout/
3.	Disallow: /customer/
4.	Disallow: /customer/account/
5.	Disallow: /customer/account/login/
To Disallow Duplicate Content
1.	Disallow: /tag/
2.	Disallow: /review/
To Disallow CMS Directories
1.	Disallow: /app/
2.	Disallow: /bin/
3.	Disallow: /dev/
4.	Disallow: /lib/
5.	Disallow: /phpserver/
6.	Disallow: /pub/
To Disallow Catalog & Search Pages
1.	Disallow: /catalogsearch/
2.	Disallow: /catalog/product_compare/
3.	Disallow: /catalog/category/view/
4.	Disallow: /catalog/product/view/
To Disallow URL Filter Searches
1.	Disallow: /*?dir*
2.	Disallow: /*?dir=desc
3.	Disallow: /*?dir=asc
4.	Disallow: /*?limit=all
5.	Disallow: /*?mode*
Robots.txt Tester & Validator
Now, that you have created the Robots.txt file, you can check & validate the file via Google’s Robots.txt Testing tool. With this tool, you can identify & validate robots.txt file errors.
Most Popular Web Crawlers and User-Agents
Below is the list of the most common Search Engine bots:User-agent: Googlebot User-agent: Googlebot-Image/1.0 User-agent: Googlebot-Video/1.0 User-agent: Bingbot User-agent: DuckDuckBot User-agent: YandexBot User-agent: Baiduspider User-agent: ia_archiver #Alexa User-agent: Slurp #Yahoo
Final Thoughts
As stated above, robots.txt file instructs web crawlers how to index your website. It is the way to communicate with search engines. To make sure your Magento 2 store pages are indexed and displayed the way you want, it is important to generate your Magento 2 robots.txt file correctly. You don’t have to manually create the file as Magento creates it automatically. You can just add custom instructions to the file and it will be configured accordingly.
If you have any issue in configuring robots.txt file for you shop, then contact our support team for an instant solution.Related Articles: